Introduction
The congestion control plane (CCP) is a new platform for writing and sharing datapath-agnostic congestion control algorithms. It makes it easy to to program sophisticated algorithms (write Rust or Python in a safe user-space environment as opposed to writing C and a risk of crashing your kernel), and allows the same algorithm implementation to be run on a variety of datapaths (Linux Kernel, DPDK or QUIC).
You probably ended up at this guide for one of three reasons. You want to...
- Run an existing algorithm -- If you just want to use a CCP algorithm that's already been implemented (either by us or someone else), use the following section to install the necessary dependencies, then skip to Section 5 for instructions on building and running algorithms.
- Build a new algorithm -- If you want to write your own algorithm using CCP, you should follow the rest of the guide in order. If you just want to do something simple, it may be sufficient to copy one of our existing algorithm repositories and modify it to fit your needs, but at the very least you will want to follow the instructions in the setup section below.
- Reproduce Results -- If you'd like to reproduce the results found in our SIGCOMM '18 paper, please see the eval-scripts repository.
NOTE: Portus is our Rust implementation of CCP, but in most cases you won't actually need to clone or build it individually because it is provided as a library. Whether you are writing your own algorithm or using an existing one, Portus is available through package managers in Rust (cargo) and Python (pip). You only need to check out the repository directly if you would like to make changes to the library/API itself.
Setup
-
Regardless of whether you'd like to run or build an algorithm in Rust or Python, you'll need to install Rust (nightly version) and Cargo (Rust's package manager). Any method of installing Rust should work, but we recommend the following:
curl https://sh.rustup.rs -sSf | sh -s -- -y -v --default-toolchain nightly -
Next, you'll need to pick a datapath and install our datapath integration. We currently support the following three datapaths. If you're not sure, you probably want the Linux Kernel. This integration has received the most use and is the easiest to set up, but we have successfully run all of the same experiments and tests on the other datapaths as well. If you would like to use a datapath that is not listed below, you'll need to add support yourself (see New Datapaths).
Linux (kernel module)
Clone our kernel module:
git clone https://github.com/ccp-project/ccp-kernel.gitFetch submodules:
git submodule update --init --recursiveBuild:
cd ccp-kernel && makeInstall: (provide
ipc=0to use netlink sockets):sudo ./ccp_kernel_load ipc=0mTCP / DPDK (fork)
Clone our fork:
git clone https://github.com/ccp-project/ccp-mtcp.gitFollow the instructions in
REAMDE.mdfor building mTCP as normal (and for building DPDK first, if you haven't done so already).More detailed instructions coming soon.
Google QUIC (patch)
Our patch currently lives at https://github.com/ccp-project/ccp-quic
Follow the instructions in
README.mdfor applying the patch.More specific instructions for getting QUIC setup from scratch coming soon.
-
Clone an existing algorithm or write your own by following the rest of the guide. We have implemented the following algorithms:
-
Build the algorithm
Rust
Just run
cargo buildin the root of the repository. If you run into any build errors, see Common Problems.Python
Assuming you have python and pip installed, just run
pip install --user portus. If you run into any build errors, see Common Problems. -
Follow instructions in Running Algorithms to use CCP.
CCP Programming Model
Traditionally, congestion control algorithms, and thus the API provided by datapaths, have been designed around the idea of taking some action upon receiving each packet acknowledgement.
In contrast, CCP is built around the idea of moving the core congestion control logic off of the immediate datapath in order to gain programmability. However, in order to maintain good performance, rather than moving it entirely, we split the implementation of a congestion control algorithm between the datapath and a userspace agent. The datapath component is restricted to a simple LISP-like language and is primarily used for collecting statistics and dictating sending behavior, while the userspace algorithm can be arbitrarily complex and is written in a language like Rust or Python with the support of all their available libraries.
Thus, writing an algorithm in CCP actually involves writing two programs that work in tandem and communicate asynchronously, which requires a slightly different way of thinking about congestion control implementation. Typically, the datapath program will look at each ACK to gather statistics and periodically report a summary of those statistics to the userspace agent, who then makes a decision about how to modify the sending behavior. In other words, the userspace agent is typically making a decision based on a batch of ACKs rather than each individual one. We initially experimented with reporting every single ACK to the userspace agent, but we found that (1) this doesn't scale sufficiently, and (2) responding on a less-frequent basis, e.g. once-per-RTT, does not compromise performance of any algorithms we tested.
More details and experimental results can be found in our SIGCOMM '18 paper.
The syntax and structure of the datapath program language is detailed in the following section.
Documentation
CCP currently supports writing algorithms in Rust, or (through language bindings) Python. We don't plan on adding new language bindings in the near future, but will gladly accept pull requests!
Whichever language you decide to use, you will also need to understand our domain-specific language for writing datapath programs (don't worry, it's very simple!). See the following section for the syntax and capabilities of this language.
Datapath Programs
CCP datapath programs use a LISP-like syntax (parenthesized, prefix notation), but have a very limited set of functionality: the language is expressive enough to accomplish anything you might need for congestion control, but limited enough that the programs are very easy to reason about. The language is intentionally not turing complete for security purposes.
Datapath programs are event-driven programs that run in the context of each individual flow.
The required structure of these programs is simple: a single block of variable definitions, followed by a series of events and corresponding event handlers.
Variable Definitions
Variables only have two possible types: booleans and integers (which are internally represented as u64), and must be given a default value.
There are two classes of variables:
- Report variables are included in all reports sent to the userspace agent each time the
(report)command is called (more on this below). - Control variables are not included in reports.
Adding the keyword volatile before a variable name means that it will automatically be reset to its provided default value when the (report) command is called. Both report variables and control variables may be volatile. Volatile control variables will still be reset to their default on each report, they just won't be included in the report.
The first expression in a datapath program must be the variable definition. The syntax is best explained by example:
(def
	(Report
		(volatile reportVarA 0)
		(reportBarB true)
		...
	)
	(contolVarA true)
	(volatile controlVarB false)
	...
)
In this example, we have two report variables and two control variables. The include "report" and "control" in the names for clarity, but this is not a requirement. When the (report) statement is reached, reportVarA and controlVarB will be reset to 0 and false, respectively, while reportVarB and controlVarA will not.
Events and Handlers
Following the variable definition expression is a series of when clauses, each of which define a condition and a series of statements to be executed when that condition becomes true.
The syntax is (when [condition] [statements]) where "condition" is any expression (all expressions evaluate to a true or false value, as in C), and "statements" is a series of expressions.
Operations
+,-,*,/:=orbindfor setting variables- Boolean operators (
||and&&) >,>=,<,<=,==
Control Flow
Ifstatements- No loops
(fallthrough)(report)
Flow and ACK Statistics
The Flow struct provides read-only access to a number of a flow-level statistics that are maintained by the datapath:
Flow.packets_in_flightFlow.bytes_in_flightFlow.bytes_pending: bytes currently buffered in the network stack waiting to be sentFlow.rtt_sample_us: sample of the RTT in microseconds based on ACK arrivals for this flowFlow.was_timeout: boolean indicating whether or not this flow has received a timeoutFlow.rate_incoming: estimate of the receive rate over the last RTTFlow.rate_outgoing: estimate of the send rate over the last RTT
The Ack struct provides read-only access to specific information from the single most recently received ack.
Ack.bytes_ackedAck.packets_ackedAck.bytes_misorderedAck.packets_misorderedAck.ecn_bytesAck.ecn_packetsAck.lost_pkts_sampleAck.now
Sending Behavior
The sending behavior of a flow can only be controlled by modifying either the Cwnd or Rate variables. These can be set either directly inside of a datapath program, or via an update_fields call in the userspace agent.
For example, to increase the cwnd by the number of bytes acked on each ack (i.e. slow-start):
(when true
	(:= Cwnd (+ Cwnd Ack.bytes_acked))
)
This is equivalent to cwnd += Ack.bytes_acked.
Common Expressions
when true
Expressions inside of a when true clause are run on every ack.
Timers
Timers can be achieved using Micros
Rate Patterns
(
)
Rust
See docs.rs/portus.
Python
Coming soon!
For now, following the Python version of the tutorial below should be sufficient.
Please reach out to us at ccp@csail.mit.edu if you have any problems.
Tutorial
In this tutorial, we'll walk through the process of implementing a very simple congestion control algorithm in CCP and then running and debugging that implementation in an emulator.
We'll be using Portus v0.3.3. The first part covering algorithm implementation is agnostic to datapath, but for the second part we'll be using the Linux Kernel datapath. Please let us know if you run into any problems during this tutorial by submitting a GitHub issue.
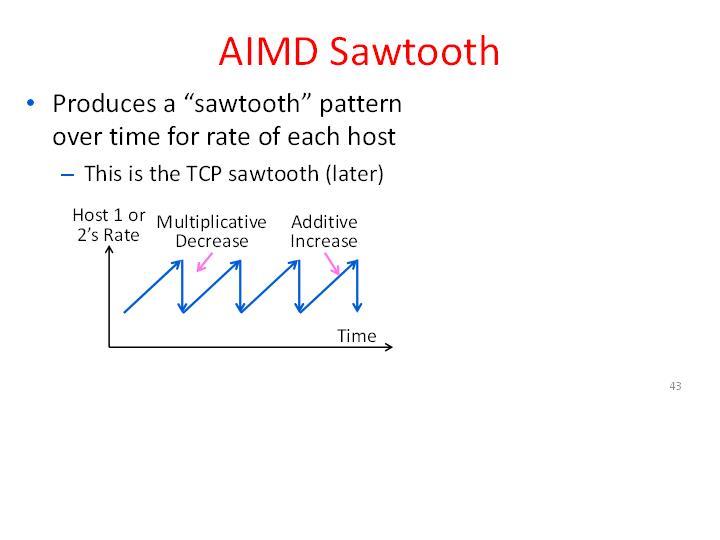
The focus here is to explain the CCP programming model, so we'll be implementing a very simple scheme: AIMD (additive-increase multiplicative-decrease). Before we even start talking about CCP, let's briefly go over exactly how the algorithm works and what kind of behavior we expect to see. We assume a basic familiarity with the problem of congestion control. If you need some background, Van Jacobson's paper is a good place to start.
AIMD Scheme
The high-level idea is to start with a low cwnd, and then as ACKs are received, probe for more bandwidth by continually increasing the cwnd (additively) until eventually a loss occurs, which signals congestion. We then cut our rate (multiplicatively) and repeat. If you were to graph the congestion window over time of a single flow running this scheme in the prescence of a droptail buffer, it would exhibit the classic "sawtooth" behavior:
Specifically, we'll use the following algorithm:
- On each ACK, increase CWND by 1/cwnd (this has the affect of increasing the cwnd by roughly 1 packet per RTT)
- On each loss, cut CWND by 1/2
Implementation
Python
In Portus, a congestion control algorithm is represented as a python class and a new instance of this class is created for each flow (and deleted when this flow ends). This class must be a subclass of `portus.AlgBase` and must implement the following 3 methods:
init_programs(): return all DATAPATH programs that your algorithm will use.- Returns a list of 2-tuples, where each tuple consists of (1) a unique (string-literal) name for the program, and (2) the program itself (also a string-literal).
- Note: this is a static/class method, it does not take self, and thus will produce the same result for all flows
on_create(self): initialize any per-flow state (and store it inself), and choose an initial datapath program to use.- Doesn't return anything.
on_report(self, r): all algorithm logic goes here, called each time your datapath progarm executes(report).- The report parameter
ris a report containing all of the fields you defined in your datapath program Report structure, plus two permanent fields,CwndandRate, which are the current congestion window and rate in the datapath at the time of this report. - Doesn't return anything.
- The report parameter
Since python (2) doesn't have type annotations, we use our own runtime type checker to ensure:
- Your class is a subclass of
portus.AlgBase. - All 3 methods are implemented.
- Each method takes the correct parameters (names must match exactly).
- Each method returns the correct type (mainly relevant for
init_programs).
Thus, the minimal working example that will pass our type checker is as follows:
import portus

class AIMD(portus.AlgBase):          # <-- subclass of AlgBase

    def init_programs(self):
        return [("name", "program")] # <-- note the example return type

    def on_create(self):
        # TODO initial state
        # TODO self.datapath.set_program(...)
        pass

    def on_report(self, r):
        # TODO do stuff with r
        # TODO maybe change cwnd or rate: self.datapath.update_field(...)
        pass
Starting with this base, we will go through the implementation of AIMD one function at a time...
Rust
Some rust stuff here...
init_programs(self)
To start out, we need to think about how to split the implemention between the datapath and userspace. For AIMD, the main things we need to keep track of are ACKs to increment our window and losses to cut our window. Although we could ask the datapath to give us this information on every ACK or loss detected, this wouldn't scale well. Since it takes one RTT for our algorithm to get feedback about a given packet on the network in steady state, it is pretty natural to update our state once per RTT (note: this is by no means fundamentally correct, so feel free to play around with differnet time scales!). A common pattern in CCP is to aggregate per-ACK statistics (such as the number of bytes ACKed) over a given time interval and then periodically report them to the userspace agent, which handles the logic of how to adjust the window or rate.
Although they work in tandem, it makes sense to think about the datapath program first, since the userspace agent reacts to events generated by the datapath. (For a detailed background on CCP datapath programs, read this.)
As mentioned above, for this algorithm we want to collect two statistics in the datapath, number of packets ACKed and number of packets lost, so we'll define our Report structure as follows:
(def (Report
    (volatile packets_acked 0)
    (volatile packets_lost 0)
))
The 0 after each value sets the default value and the volatile keyword tells the datapath to reset each value to it's default (0) after each report command.
Next, we'll specify our event handlers. First, we'll use the when true event to update our counters on each ACK (the event handler is run on each ACK, represented by the Ack structure):
(when true
    (:= Report.packets_acked (+ Report.packets_acked Ack.packets_acked))
    (:= Report.packets_lost (+ Report.packets_lost Ack.lost_pkts_sample))
    (fallthrough)
)
The (fallthrough) statement tells the datapath to continue checking the rest of our event handlers. Without this statement, the datapath would stop here even if the other event conditions resolved to true.
The only other condition we need is a timer that sends a report once per RTT. This can be implemented using the Micros variable. This variable starts at 0 and represents the number of microseconds since it was last reset. (Flow contains some flow-level statistics, such as the datapath's current estimate of the RTT in microseconds, which comes in handy here):
(when (> Micros Flow.rtt_sample_us)
    (report)
    (:= Micros 0)
)
This condition resolves to true if Micros is greater than one RTT, and then resets it so that it can fire again on the next RTT. (NOTE: Micros is only reset by you. If you forgot to reset it, this condition would keep firing on every ACK because it will only be increment on each ACK).
Although this is not absolutely necessary, when a loss happens, we should probably know about that right away. A loss (in the simplistic model assumed by this algorithm) indicates that we are putting packets into the network too quickly. Therefore, if we were to continue sending at this rate for up to 1 RTT after receiving the first loss, we may introduce further losses. We can add another when clause to give us a report immediately upon any loss.
(when (> Report.packets_lost 0)
    (report)
)
We can now write init_programs by putting this together into a string literal and giving our program a name ("default"):
def init_programs(self):
    return [
        (("default"), ("""\
            (def (Report
                (volatile packets_acked 0)
                (volatile packets_lost 0)
            ))
            (when true
                (:= Report.packets_acked (+ Report.packets_acked Ack.packets_acked))
                (:= Report.packets_lost (+ Report.packets_lost Ack.lost_pkts_sample))
                (fallthrough)
            )
            (when (> Micros Flow.rtt_sample_us)
                (report)
                (:= Micros 0)
            )
            (when (> Report.packets_lost 0)
                (report)
            )
        """)
    ]
NOTE: If you don't return any programs here, there will be no logic to decide when your algorithm receives reports, and thus your algorithm won't receive any callbacks beyond the creation of each flow.
Writing create
on_create(self)
As mentioned before, we'll do two simple things here:
- Initialize state.
The only state our algorithm needs is a congestion window. We'll start by setting a congestion window equal to 10 full packets. We can get the size of a packet (the maximum segment size, or MSS) from the datapath_info struct that is automatically provided in self:
self.cwnd = float(self.datapath_info.mss * 10)
- Set the initial datapath program.
In this case, we only have one, but if you had created multiple programs in init_programs you could choose to use any of them here. The second argument allows us to initialize some values within the datapath. The self.cwnd variable we created above is our internal notion of the cwnd, but we need to explicitly send this value to the datapath as well.
self.set_program("default", ["Cwnd", self.cwnd])
NOTE: There is no default program. Even if you returned programs in init_programs, if you don't set one here, again your algorithm won't receive any more callbacks for this flow.
NOTE: As mentioned above, the userspace agent is totally separate from the datapath. Any state kept here does not change anything in the datapath automatically. If you want to update variables, such as the cwnd or rate, in the datapath, you need to explicitly do so using set_program or update_fields.
on_report(self, r)
Now we can implement the core algorithm logic. The structure of r was defined in the Report structure of our datapath program, so we can access our two fields here: r.packets_acked and r.packets_lost. First, we'll calculate the correct cwnd adjustment:
if r.packets_lost > 0:
    self.cwnd /= 2
else:
    self.cwnd += (self.datapath_info.mss * r.packets_acked) * (1 / self.cwnd)
Then we send that value to the datapath:
self.datapath.update_fields(["Cwnd", self.cwnd])
Full AIMD Source Code
Source code of an example AIMD congestion controller:
import sys
import portus

class AIMDFlow():
    INIT_CWND = 10

    def __init__(self, datapath, datapath_info):
        self.datapath = datapath
        self.datapath_info = datapath_info
        self.init_cwnd = float(self.datapath_info.mss * AIMDFlow.INIT_CWND)
        self.cwnd = self.init_cwnd
        self.datapath.set_program("default", [("Cwnd", int(self.cwnd))])

    def on_report(self, r):
        if r.loss > 0 or r.sacked > 0:
            self.cwnd /= 2
        else:
            self.cwnd += (self.datapath_info.mss * (r.acked / self.cwnd))
        self.cwnd = max(self.cwnd, self.init_cwnd)
        self.datapath.update_field("Cwnd", int(self.cwnd))


class AIMD(portus.AlgBase):

    def datapath_programs(self):
        return {
                "default" : """\
                (def (Report
                    (volatile acked 0)
                    (volatile sacked 0)
                    (volatile loss 0)
                    (volatile timeout false)
                    (volatile rtt 0)
                    (volatile inflight 0)
                ))
                (when true
                    (:= Report.inflight Flow.packets_in_flight)
                    (:= Report.rtt Flow.rtt_sample_us)
                    (:= Report.acked (+ Report.acked Ack.bytes_acked))
                    (:= Report.sacked (+ Report.sacked Ack.packets_misordered))
                    (:= Report.loss Ack.lost_pkts_sample)
                    (:= Report.timeout Flow.was_timeout)
                    (fallthrough)
                )
                (when (|| Report.timeout (> Report.loss 0))
                    (report)
                    (:= Micros 0)
                )
                (when (> Micros Flow.rtt_sample_us)
                    (report)
                    (:= Micros 0)
                )
            """
        }

    def new_flow(self, datapath, datapath_info):
        return AIMDFlow(datapath, datapath_info)

alg = AIMD()

portus.start("netlink", alg, debug=True)
Running CCP Algorithms
At this point, you should have an algorithm that builds successfully, either by following the instructions in Setup to build an existing algorithm or by writing and building your own.
First, you need to start the CCP user agent:
Rust
When you run cargo build in a CCP algorithm repository, cargo puts all of the build files
and final binaries in the local ./target directory. You can use the following command
to start the CCP userspace agent:
sudo ./target/[MODE]/[ALG_NAME] --ipc [IPC]
MODEis either debug or release. You should runreleaseunless you're running into problems.- Check the top of
Cargo.tomlto find the exact algorithm name. It is usually what you'd expect. IPCspecifies what IPC mechanism should be used to contact the datapath component. It can either "netlink" (only for Kernel), "chardev" for character device, or "unix" for unix sockets.- IMPORTANT -- this must match the parameters you provided when setting up the datapath component.
sudois only necessary if the IPC mechanism requires it. It is currently required for netlink sockets and the character device since they communicate with the Linux kernel, but not required if you are using unix sockets.
For example, a typical run of BBR with the Linux Kernel would look like this:
sudo ./target/release/bbr --ipc netlink
Python
If you haven't already, install portus via pip: pip install --user portus.
Simply run sudo python [ALG].py. If you need to change the ipc mechanism, see the
connect method in the python source file. We have not provided command line arguments
by default, but you can always add them for convenience by using e.g. argparse.
Now that CCP is running, any sockets that set the TCP_CONGESTION sockopt to "ccp" will
use this algorithm implementation. Some applications such as iperf conveniently allow
this to be set directly from the command line.
Add -Z ccp for iperf(v2) or -C ccp for iperf3.
This is a work in progress. Coming Soon!
Debugging (TODO)
Use sys.stdout.write("...\n")
Emulation (TODO)
Install Mahimahi
iperf -s -p 9001
iperf -c $MAHIMAHI-BASE -p 9001 -i 1 -Z ccp
Live Monitoring (TODO)
Common Problems
Building Userspace Agent
- Make sure
rustandcargoare up to date usingrustup update - Make sure you are using the nightly version of Rust when building with Cargo
- If you have problems installing python with
pip, try building the language bindings from the Portus repository directly (just clone Portus and runmakein thepython/directory).
Building Datapath Component
Linux Kernel
- Make sure you are using a supported kernel version:
4.13 <= version <= 4.16 - If you recently installed a new kernel, make sure you have rebooted your machine
- If you are unable to install
Running CCP
-
If you get an error like the following, it means portus is not able to communicate with your datapath. This is either because (1) the datapath integration is not installed / running, (2) you have selected a different IPC mechanism than the datapath, or (3) the IPC mechanism is not working.
'called
Result::unwrap()on anErrvalue: Error("Failed to install datapath program "copa": Error("portus err: No such file or directory (os error 2)")")', src/libcore/result.rs:1009:5
Adding Datapath Support
In order to collect measurements about the network and actually affect the sending behavior of flows, the userspace agent must communicate with the transport layer (datapath). We have designed a common API for the communication between userspace agent and datapath and implemented this in a C library called libccp. The API is simple and makes supporting a new datapath relatively easy. This rest of this section describes how to use libccp to implement a new datapath.
All three of the datapath integrations we provide use libccp, so these may be useful references for writing your own datapath integration.